Frustrated with guitar strings that constantly slip, buzz, or break prematurely? The struggle is real for countless guitarists, impacting playing enjoyment and potentially damaging your instrument. Whether you're a seasoned pro battling intonation issues or a beginner grappling with basic string changes, the experience is equally disheartening. Achieving perfectly tuned, stable strings is crucial for a resonant and reliable tone, transforming your playing experience from frustrating to fulfilling. Inconsistent string tension can lead to tuning instability and even damage your guitar's bridge and tuning pegs over time.
This article will provide you with the ultimate guitar stringing technique, a step-by-step guide designed to eliminate slipping strings once and for all. We'll cover everything from preparing your guitar to the final tuning, ensuring each step is performed correctly for optimal string stability and longevity. Get ready to say goodbye to frustrating tuning sessions and hello to consistently perfect sound!
Preparation and Safety Guidelines
- Guitar
- Guitar Strings
- String Winders (optional)
- Pencil with graphite (optional)
- String Cutters
- Always tune your guitar slowly and gradually to avoid snapping strings. Sudden tension changes are the biggest risk.
- Use new strings only, old or damaged strings are more prone to slipping and breaking. Make sure your tuning pegs are in good working order.
- If a string keeps slipping, carefully re-seat it into the tuning peg hole, ensuring a firm and proper fit before tightening. Consider using a string winder for more control.
Step-by-Step Instructions
Prepare the Strings
- Insert strings into the bridge.
- Pull each string up, leaving a small amount of slack (enough to create a small loop).

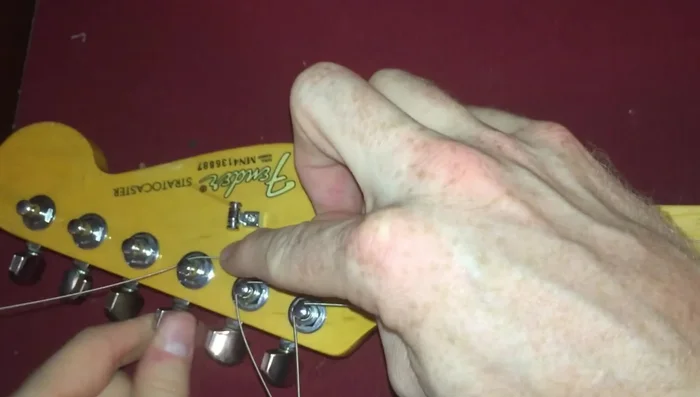
Prepare the Strings Route the String Through the Tuner
- Push the string through the tuner post.
Route the String Through the Tuner Create the Locking Loop
- Guide the string underneath the adjacent string on the tuner post, then over the top.
- Repeat step 4 to create a small 'lock' that prevents the string from slipping.
Create the Locking Loop Secure the String
- Tighten the string, ensuring the loop is secure. The loop should crimp against the adjacent string.
Secure the String Repeat for All Strings
- Repeat steps 2-6 for all strings.
Repeat for All Strings Finish Up
- Trim the excess string.
- Tune your guitar and stretch the strings.
Finish Up


Read more: Revitalize Your Guitar Strings: A Quick & Easy Cleaning Guide
Tips
- Use spinning string trees for smoother bending and whammy bar use.
- Apply graphite from a pencil to the string trees to reduce friction.
- Always wrap the string underneath the adjacent string to create a secure lock.