The quest for the perfect acoustic guitar tone, especially in a studio setting, is a journey many musicians undertake. Finding that sweet spot between natural warmth and impactful clarity can feel elusive, often requiring a careful balance of amplification and effect choices. While a pristine acoustic can certainly shine on its own, a well-crafted pedalboard can unlock a universe of sonic possibilities, transforming your instrument from mellow to majestic with the flick of a switch. The right pedals, strategically placed, can add depth, texture, and a professional sheen that elevates your recordings to a whole new level.
This article delves into building the ultimate acoustic guitar pedalboard, providing a step-by-step guide to achieving studio-quality tone at home. We'll explore essential pedals – from subtle enhancements to bolder effects – and discuss the importance of signal routing for a seamless and optimized workflow. Prepare to unlock the full potential of your acoustic guitar and discover a new dimension in your sonic palette.
Preparation and Safety Guidelines
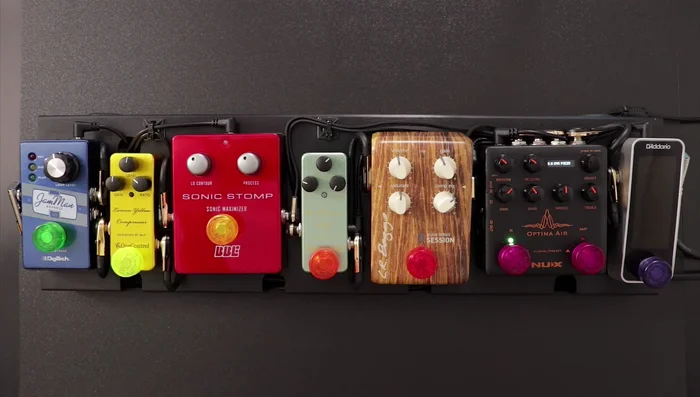
- Acoustic Guitar
- Fishman Loudbox Mini Amplifier
- Tuner Pedal
- Optima Air Impulse Response Pedal (New X)
- LR Baggs Session Pedal
- One Control Turquoise Delay
- bbe Sonic Maximizer Pedal
- One Control Lemon Yellow Compressor
- Audio Interface
- Always power your pedals with a properly rated isolated power supply to prevent ground loops and hum. Using a daisy chain can introduce noise and damage your gear.
- Experiment with pedal order! The order in which your pedals are placed significantly impacts your tone. There's no one 'right' order, so find what sounds best to your ears.
- Use high-quality cables. Cheap cables can introduce noise and significantly affect your signal's clarity and tone. Invest in good quality instrument cables and power cables.
Step-by-Step Instructions
Tuning
- Tune your guitar.

Tuning Mic Simulation and Tone Shaping
- Use an impulse response (IR) pedal to emulate the sound of a microphone recording a natural acoustic guitar tone. This helps to counter the often-hyped and artificial sound of piezo pickups.
- Apply EQ to shape your tone. Adjust the bass and treble frequencies to achieve a balanced and pleasing sound. The Optima Air pedal provides a three-band EQ.
Mic Simulation and Tone Shaping Dynamics Control and Compression
- Use a compressor to smooth out dynamics and tame problematic frequencies. The LR Baggs Session pedal offers a transparent multi-band compressor with integrated EQ and subtle saturation.
Dynamics Control and Compression Ambience and Effects
- Add ambience with reverb and delay. A blend of reverbs from your amplifier and a delay pedal can create a natural-sounding spaciousness.
Ambience and Effects Advanced Tone Enhancement
- Use a sonic maximizer pedal (like the bbe Sonic Stomp) to boost clarity and presence in your tone. This acts as an advanced EQ, adjusting phase relationships between frequencies.
- Add a final boost/compression stage (like the One Control Lemon Yellow Compressor) at the end of the chain for sustain and volume increases when playing lead lines or intricate parts.
Advanced Tone Enhancement


Read more: Best Multi-Effects Pedals for Guitarists in 2017: A Comprehensive Review
Tips
- Being in tune is the first step to a great guitar tone.
- Piezo pickups have a hyped quality; IR pedals help to create a more natural sound.
- Compression pedals can subtly adjust the EQ curve of your sound.
- The LR Baggs Session pedal is a fantastic tool for acoustic guitar.